Azure Static Website Hosting
Last Updated: February 13, 2020
Hosting your site on Azure makes it fast, cheap, and easy to manage. Adding Cloudflare on top of it reduces your bandwidth bill and makes it easy to add page rules.
For me, it comes out to be about 10 cents a month for about 15GB of data served each month.
Azure Storage Account Setup
Log onto the Azure Portal, select storage accounts, click add.
Give it a name and assign it to a subscription / resource group. For the Replication, select Locally-redundant storage (LRS). This is the cheapest, and anything else is overkill. Select Hot for the Access tier.
Under Networking, leave as Public endpoint, change if you only want it to be accessible from certain networks.
Under Advanced, disable Secure transfer required.
Select Review + create and Create.
Click on the newly created storage account.
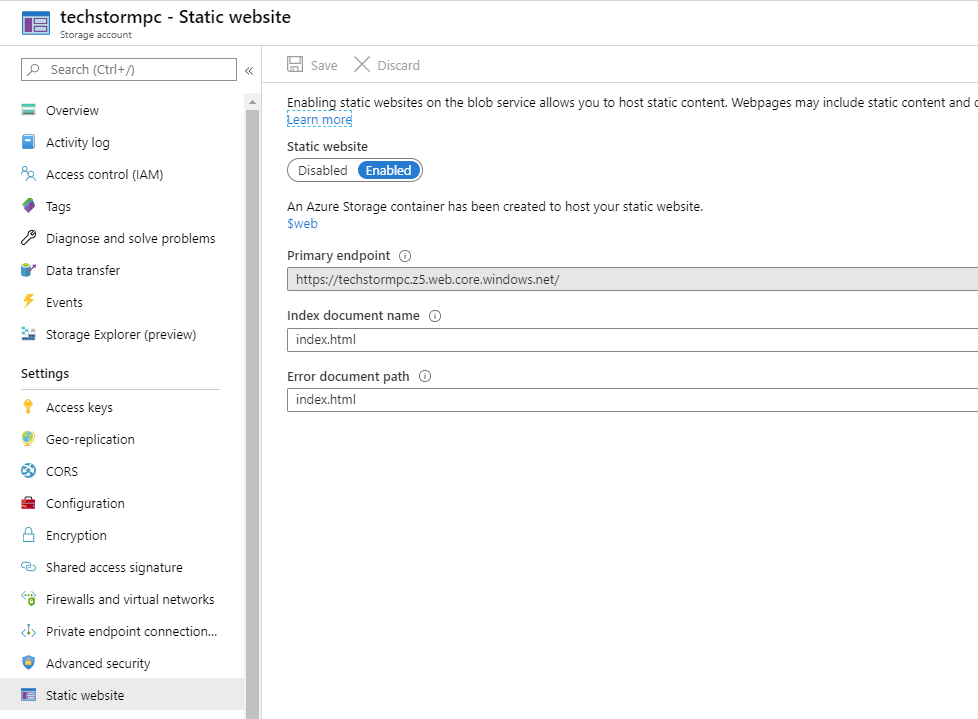
Select Static website on the sidebar. Select Enabled. Set the Index document name (usually index.html). Press Save.
Go to Custom domain. Type in the domain you wish to use.
- Skip this step if you are using Azure CDN.
- You must have a CNAME record on your domain pointing to
<storage_blob_name>.z5.web.core.windows.net - Select Use indirect CNAME validation if you wish to set this up before setting the DNS records. This is useful for sites that are already live and you don't want downtime.
Azure CDN Setup
You will need to use Azure CDN if you want the site to be accessible at domain.com and at www.domain.com or want to have any page rules set up.
Alternatively, you can use Cloudflare page rules to redirect to one or the other but you only get a maximum of three rules on the free plan.
See below for an example for some common page rules
Click on Azure CDN on the storage account page.
- You can read about the differences between the CDNs here. Note that the page rules on the Verizon tiers take 30+ minutes to go into effect. The Standard Microsoft tier seems to work fine in most cases.
Enter the CDN Profile name, the pricing tier, and the endpoint name. Replace the
blobwithz5to match the website endpoint. Click create.Once it redirects to the CDN endpoint, click + Custom domain and enter the domain names.
Under the Compression tab, make sure it is set to On.
Rules engine
Strip out
.htmlRedirect to another site on mobile
- Add condition, Device Type equals Mobile
- Add action, Type: Temporary redirect, enter hostname
Redirect http to https
- Add contition, Request protocol equals HTTP
- Add action, URL Redirect, Type: 301, Protocol: HTTPS, leave others blank to match incoming request.
Azure Pipelines Deploy
Steps needed to deploy on Azure Pipelines (DevOps).
File copy
Use the Azure file copy version 2 task. Use this for the parameters:
- Source: select the folder you wish to copy. In my case it is
dist/in the artifact directory. This is dependent on your build pipeline. - Azure Connection Type: Azure Resource Manager
- Azure Subscription:
<your_subscription_name> - Destination Type: Azure Blob
- RM Storage Account:
<your_storage_account_name> - Container Name: $web
Clear Azure CDN cache
The Microsoft-hosted pipelines agent has Azure CLI installed. If you have a self-hosted agent, then you will need to install it manually.
az cdn endpoint purge -g <resource-group> -n <endpoint-name> --profile-name <profile-name> --content-paths "/*"
Clear Cloudflare cache
Add a Powershell task in DevOps that runs the below command.
- Replace the URLs in
$datawith your site. - Replace
<token>with your Cloudflare token.- Create a token from My Profile -> API Tokens -> Create Token
- The permissions that it needs are
Zone : Cache Purge : Edit. You can include all zones or just specific ones.
- Replace
<zone>with your zone.- You can find the zone by going to the overview page on your domain. If you scroll down you should see the API / Zone ID section.
The below script is in Powershell, but you can easily replicate this in bash or python.
Set $env:CF_TOKEN="<token>" and $env:CF_ZONE="<zone>".
$data = @'
{
  "files": [
    "http://www.techstormpc.com/*",
    "https://www.techstormpc.com/*",
    "http://techstormpc.com/*",
    "https://techstormpc.com/*"
  ]
}
'@

$headers = @{
   "Authorization" = "Bearer $env:CF_TOKEN"
   "Content-Type" = "application/json"
}

Invoke-RestMethod `
  "https://api.cloudflare.com/client/v4/zones/$env:CF_ZONE/purge_cache" `
  -Method POST `
  -Body $data `
  -Headers $headers